All needed files are here
https://drive.google.com/drive/folders/1mP6phOI8vzLVd-FKC0OVonNfgWLwrYSi
To run on local laptop, VPN must start
Installing Apache Spark and Scala
Windows
1. Install a JDK (Java Development Kit) from http://www.oracle.com/technetwork/java/javase/downloads/index.html .
Keep track of where you installed the JDK; you’ll need that later.
2. Download a pre-built version of Apache Spark from https://spark.apache.org/downloads.html
3. If necessary, download and install WinRAR so you can extract the .tgz file you downloaded.
http://www.rarlab.com/download.htm
4. Extract the Spark archive, and copy its contents into C:\spark after creating that directory. You
should end up with directories like c:\spark\bin, c:\spark\conf, etc.
5. Download winutils.exe from https://sundog-spark.s3.amazonaws.com/winutils.exe and move it into a C:\winutils\bin folder that you’ve created. (note, this is a 64-bit application. If you are on a 32-bit version of Windows, you’ll need to search for a 32-bit build of winutils.exe for Hadoop.)
6. Open the the c:\spark\conf folder, and make sure “File Name Extensions” is checked in the
“view” tab of Windows Explorer. Rename the log4j.properties.template file to log4j.properties. Edit this file (using Wordpad or something similar) and change the error level from INFO to ERROR for log4j.rootCategory
7. Right-click your Windows menu, select Control Panel, System and Security, and then System.
Click on “Advanced System Settings” and then the “Environment Variables” button.
-- THIS STEP DIDNT WORK
8. Add the following new USER variables: a. SPARK_HOME c:\spark b. JAVA_HOME (the path you installed the JDK to in step 1, for example C:\Program
Files\Java\jdk1.8.0_101) c. HADOOP HOME c:\winutils
9. Add the following paths to your PATH user variable:
%SPARK_HOME%\bin %JAVA_HOME%\bin
--USE THIS INSTEAD
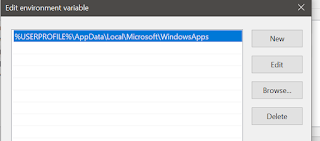
8. Make sure you have the following view
Make sure you add the _JAVA_OPTIONS variable with the value -Xmx512M
PATH variable of the USER variable
PATH variable of the system variable
10. Close the environment variable screen and the control panels.
-- NOT REALLY IMPORTANT
11. Install the latest Scala IDE from http://scala-ide.org/download/sdk.html
12. Test it out!
a. Open up a Windows command prompt in administrator mode.
b. Enter cd c:\spark and then dir to get a directory listing. c. Look for a text file we can play with, like README.md or CHANGES.txt d. Enter spark-shell e. At this point you should have a scala> prompt. If not, double check the steps above. f. Enter val rdd = sc.textFile(“README.md”) (or whatever text file you’ve found) g. Enter rdd.count() h. You should get a count of the number of lines in that file! Congratulations, you just ran
your first Spark program! i. Hit control-D to exit the spark shell, and close the console window j. You’ve got everything set up! Hooray!
MacOS
1. Install Apache Spark using Homebrew.
a. Install Homebrew if you don’t have it already by entering this from a terminal prompt:
/usr/bin/ruby -e "$(curl -fsSL https://raw.githubusercontent.com/Homebrew/install/master/install)"
b. Enter brew install apache-spark
c. Create a log4j.properties file via
cd /usr/local/Cellar/apache-spark/2.0.0/libexec/conf cp log4j.properties.template log4j.properties (substituted 2.0.0 for the version actually installed) d. Edit the log4j.properties file and change the log level from INFO to ERROR on
log4j.rootCategory.
2. Install the Scala IDE from http://scala-ide.org/download/sdk.html
3. Test it out!
a. Cd to the directory apache-spark was installed to (such as /usr/local/Cellar/apache-
spark/2.0.0/libexec/) and then ls to get a directory listing.
b. Look for a text file we can play with, like README.md or CHANGES.txt
c. Enter spark-shell
d. At this point you should have a scala> prompt. If not, double check the steps above.
e. Enter val rdd = sc.textFile(“README.md”) (or whatever text file you’ve found)
f. Enter rdd.count()
g. You should get a count of the number of lines in that file!
Congratulations, you just ran
your first Spark program! h. Hit control-D to exit the spark shell, and close the console window i. You’ve got everything set up! Hooray!
Linux
1. Install Java, Scala, and Spark according to the particulars of your specific OS.
A good starting point is http://www.tutorialspoint.com/apache_spark/apache_spark_installation.htm
(but be sure to install Spark 2.0 or newer)
2. Install the Scala IDE from http://scala-ide.org/download/sdk.html
3. Test it out!
a. Cd to the directory apache-spark was installed to and then ls to get a directory listing.
b. Look for a text file we can play with, like README.md or CHANGES.txt
c. Enter spark-shell d. At this point you should have a scala> prompt. If not, double check the steps above.
e. Enter val rdd = sc.textFile(“README.md”) (or whatever text file you’ve found)
f. Enter rdd.count()
g. You should get a count of the number of lines in that file! Congratulations, you just ran
your first Spark program!
h. Hit control-D to exit the spark shell, and close the console window i. You’ve got everything set up! Hooray!


No comments:
Post a Comment