Tuesday, September 3, 2019

[R TERADATA] Connecting to teradata from R


https://stackoverflow.com/questions/20998653/connect-r-and-teradata-using-jdbc


Download the jdbc driver from here

https://downloads.teradata.com/download/connectivity/jdbc-driver

Sometimes you need to restart the PC to make it work!

Using the R Console, enter the following steps below to make a Teradata connection:
drv = JDBC("com.teradata.jdbc.TeraDriver","ClasspathForTeradataJDBCDriverFiles") 
Example:
drv = JDBC("com.teradata.jdbc.TeraDriver","c:\\terajdbc\\terajdbc4.jar;c:\\terajdbc\\tdgssconfig.jar")  
NOTE: A path on a UNIX machine would use single forward slashes to separate its components and a colon between files.
conn = dbConnect(drv,"jdbc:teradata://DatabaseServerName/ParameterName=Value","User","Password") 
Example:
conn = dbConnect(drv,"jdbc:teradata://jdbc1410ek1.labs.teradata.com/TMODE=ANSI,LOGMECH=LDAP","guestldap","passLDAP01")
NOTE: Connection parameters are optional. The first ParameterName is separated from the DatabaseServerName by a forward slash character.
dbGetQuery(conn,"SQLquery")
Example:
dbGetQuery(conn,"select ldap from dbc.sessioninfov where sessionno=session")

[TERADATA] Uploading csv to table


1. Create table

CREATE MULTISET TABLE test_table
(
AccountID INTEGER,
Score DECIMAL(18,4),
Score_Class VARCHAR(50),
Load_Date Date
)


2. Write the insert command. Exactly same number of question marks as in the table definition
insert into test_table VALUES(?,?,?,?)

3. Define the delimiter of the file in

Tools -> Options->Export/Import

4. Make sure to ignore first line of the file as it is a header

Tools->Options->Import   Check the "Ignore the first record in the import file (Skip Header)


Sunday, July 28, 2019

[SUBLIME] Adding text autocompletion


1. From Package control in sublime install TabNine
2. Type "TabNine::sem" anywhere in sublime to start TabNine
3. To make sure python is installed and working follow instructions here https://tabnine.com/semantic
4. Check the configuration directory by typing "TabNine::config_dir"
5. Create a TabNine.toml file there with the following contents

[language.python]
command = "C:\\python37\\Scripts\\pyls.exe"

install = [["C:\\python37\\Scripts\\pip.exe", "install", "python-language-server"]]

6. Make sure to explicity include the path of pip and the pyls
7. Type TabNine::restart in text editor
8. Test python


Note: Not all pandas are supported

Thursday, July 25, 2019

[DOCKER] Setting up docker in a CentOS VM on Hyper V


1. Download CentOS image

2. Follow steps here to install CentOS ( https://www.google.com/search?q=install+centos+on+hyper-v&rlz=1C1GCEB_enDE854DE854&oq=install+centos+on+hyper&aqs=chrome.0.0j69i57j0l4.3911j0j9&sourceid=chrome&ie=UTF-8 )

  1. Download CentOS ISO from 
    https://www.centos.org/download/
  2. In Hyper-V Manager select New / Virtual Machine…
  3. Click Next on the Before You Begin page
  4. Enter Name
  5. Click Next
  6. Select Generation 1 If you don't you will not be able to mount the ISO for Cent-OS
  7. Click Next
  8. Enter 512
  9. Click Next
  10. Connect to the same external network with internet access used for your Windows VM
  11. Click Next
  12. Select Create a virtual hard disk
  13. Click Next
  14. Select Install an operating system from bootable CD/DVD-ROM
  15. Select Image file (.iso)
  16. Browse to CentOS iso.
  17. Click Next
  18. Click Finish
With the VM created it is now time to install the OS.
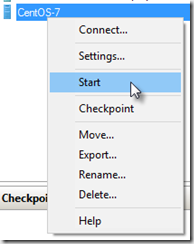
  1. Right-Click VM
  2. Select Start 
    image
  3. Double-click VM
  4. Select Install CentOS 7
  5. Press Enter
  6. Select English / English (United States)
  7. Click Continue
  8. Click Installation Destination 
    image
  9. Click Done
  10. Click Network & Host Name
  11. Make sure that you choose to have the full installation with GNOME option
  12. Click toggle to turn on 
    image
  13. Click Done
  14. Click Begin Installation
  15. Click Root Password
  16. Enter Root Password
  17. Enter Confirm
  18. Click Done
  19. Click User Creation
  20. Enter Full name
  21. Enter User name
  22. Check Make this user administrator
  23. Enter Password
  24. Enter Confirm password
  25. Click Done
  26. Click Reboot 
    image
Your server is now installed and ready for use.
To connect the VM to the internet
1. Click start
2. Hyper V manager
3. Actions -> Virtual Switch Manager 
4. Highlight external -> Create Virtual Switch
5. Give it a name
6. Highlight external network -> choose the network adapter

In the VM 
1. Click File-> Settings
2. Go to Network Adapter tab
3. Choose the Virtual switch created
4. Make sure "Enable virtual LAN" is unchecked
5. In the VM go to settings and choose wired connection

Install Docker
reference

Uninstall old versions

Older versions of Docker were called docker or docker-engine. If these are installed, uninstall them, along with associated dependencies.
$ sudo yum remove docker \
                  docker-client \
                  docker-client-latest \
                  docker-common \
                  docker-latest \
                  docker-latest-logrotate \
                  docker-logrotate \
                  docker-engine
It’s OK if yum reports that none of these packages are installed.
  1. Install required packages. yum-utils provides the yum-config-manager utility, and device-mapper-persistent-data and lvm2 are required by the devicemapperstorage driver.
    $ sudo yum install -y yum-utils \
      device-mapper-persistent-data \
      lvm2
    
  2. Use the following command to set up the stable repository.
    $ sudo yum-config-manager \
        --add-repo \
        https://download.docker.com/linux/centos/docker-ce.repo
    

INSTALL DOCKER ENGINE - COMMUNITY

  1. Install the latest version of Docker Engine - Community and containerd, or go to the next step to install a specific version:
    $ sudo yum install docker-ce docker-ce-cli containerd.io
    
    If prompted to accept the GPG key, verify that the fingerprint matches060A 61C5 1B55 8A7F 742B 77AA C52F EB6B 621E 9F35, and if so, accept it.

  1. Start Docker.
    $ sudo systemctl start docker
    
  2. Verify that Docker Engine - Community is installed correctly by running the hello-world image.
    $ sudo docker run hello-world


To add current user to avoid sudo each time docker runs

sudo usermod -aG docker $USER


Configure Docker to start on boot

Most current Linux distributions (RHEL, CentOS, Fedora, Ubuntu 16.04 and higher) use systemd to manage which services start when the system boots. Ubuntu 14.10 and below use upstart.

systemd

$ sudo systemctl enable docker
To disable this behavior, use disable instead.
$ sudo systemctl disable docker


Start manually

Once Docker is installed, you need to start the Docker daemon. Most Linux distributions use systemctl to start services. If you do not have systemctl, use the servicecommand.
  • systemctl:
    $ sudo systemctl start docker
    
  • service:
    $ sudo service docker start


Saturday, July 20, 2019

[DOCKER ON AWS] How to install Docker on AWS + download tar image from aws


Sources

[Creating connection to AWS instance using PuTTy]
https://docs.aws.amazon.com/AWSEC2/latest/UserGuide/putty.html?icmpid=docs_ec2_console

[Running docker on aws] https://docs.aws.amazon.com/AmazonECS/latest/developerguide/docker-basics.html


  1. Launch a AWS instance
  2. Create and download new key pair
  3. Open PuttyGen
  4. Load the new key pair
  5. Generate and save the new private key pair
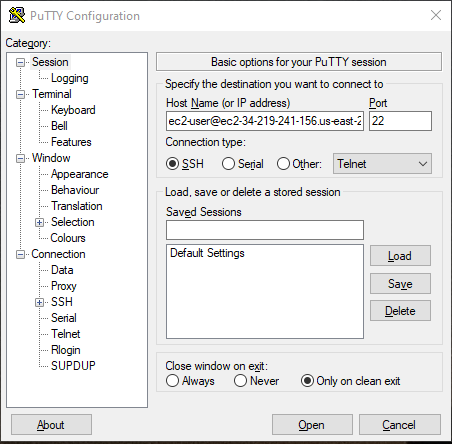
  6. Open Putty, copy the "ec2-user@csdjncs" into the Hostname tab as follows
     
       PuTTY configuration - Session
  7. In SSH -> Auth -> Click Browse and select the generated key
  8. Open the connection.

Install Docker

  1. Update the installed packages and package cache on your instance.
    sudo yum update -y
  2. Install the most recent Docker Community Edition package.
    sudo amazon-linux-extras install docker
  3. Start the Docker service.
    sudo service docker start
  4. Add the ec2-user to the docker group so you can execute Docker commands without using sudo.
    sudo usermod -a -G docker ec2-user
  5. Log out and log back in again to pick up the new docker group permissions. You can accomplish this by closing your current SSH terminal window and reconnecting to your instance in a new one. Your new SSH session will have the appropriate docker group permissions.
  6. Verify that the ec2-user can run Docker commands without sudo.
    docker info
    Note
    In some cases, you may need to reboot your instance to provide permissions for the ec2-user to access the Docker daemon. Try rebooting your instance if you see the following error:
    Cannot connect to the Docker daemon. Is the docker daemon running on this host?

Run the rstudio image

docker run -d -p 8787:8787 -e ROOT=TRUE -e PASSWORD=yourpasswordhere rocker/rstudio

Get the ip of the instance from the public IP entry

in the browser enter xxx.xxx.xxx.xxx:8787


Make sure to make the file on s3 public
Select file -> Actions -> make public


For launch scripts

#-- Linux AMI 2018.03
#!/bin/bash
yum update -y
yum-config-manager --enable rhui-REGION-rhel-server-extras
yum -y install docker
service docker start
usermod -a -G docker ec2-user
cd /home/ec2-user/
wget "https://abolfadl.s3.eu-central-1.amazonaws.com/docker/images/mabolfadl_rstudio_libs.tar"

#-- After opening a shell with putty
docker load < mabolfadl_rstudio_libs.tar
docker run -p 8787:8787 -e PASSWORD=asd123 $(docker images -q)

#-- Ubuntu
sudo yum update -y
sudo amazon-linux-extras install docker
sudo service docker start
sudo usermod -a -G docker ec2-user
wget "https://abolfadl.s3.eu-central-1.amazonaws.com/docker/images/mabolfadl_rstudio_libs.tar"

#-- After opening a shell with putty
docker load < mabolfadl_rstudio_libs.tar
docker run -p 8787:8787 -e PASSWORD=asd123 $(docker images -q)


Thursday, July 18, 2019

[RED HAT LINUX] Installing software offline

Source

https://unix.stackexchange.com/questions/443149/how-to-get-package-dependency-tree-for-offline-download-when-you-have-no-interne


First, create a Virtual Machine and do a fresh install of the same RHEL version on it. Make sure you perform a minimal installation so that the packages installed on the machine are kept to the minimum required for the machine to run.
Then, run the following commands on the machine:
[vm]# mkdir /root/tmppkg
[vm]# yum --downloadonly --downloaddir=/root/tmppkg install foobar
Yum will download Foobar and all its dependencies recursively, storing the RPMs in the directory mentioned above.
Create a repository from the bunch of packages downloaded by Yum.
[vm]# chown -R root:root /root/tmppkg
[vm]# createrepo /root/tmppkg
[vm]# chmod -R 755 /root/tmppkg
Transfer the tmppkg directory on the server (via USB thumb drive or CD-ROM) and put it in the /share directory. Then create a file /etc/yum.repos.d/local.repo as such:
[local]
name=Local repository
baseurl=file:///share/tmppkg
enabled=1
gpgcheck=0
protect=1
Now you can install the Foobar package on the server in the usual way. The package manager will fetch all the necessary content from the newly created local repository:
[server]# yum install foobar
Once you’ve installed the package, the /share/tmppkg directory can be safely deleted.

Loud fan of desktop

 Upon restart the fan of the desktop got loud again. I cleaned the desktop from the dust but it was still loud (Lower than the first sound) ...